How to Install XP drivers in Vista
In case you are still running Windows XP and are considering switching to Vista, one of the things to check is driver availability. Although Vista supports a lot of hardware devices out of the box, there is still quite a lot of hardware that does not have a Vista driver. It would be a pity if you finally upgrade and your scanner, webcam or printer does not work anymore.
Check Vista Hardware Compatibility
Most hardware manufacturers have or will update their drivers to be Vista compatible, but for older models of their hardware, they often do not. So checking in advance is a good thing. You can use the Microsoft Windows Vista Compatibility Center to check your hardware. Make sure to open it in IE as it will not work in other browsers (talking about compatibility!).
Checking for Vista Drivers
Once Vista is installed, of course, you first want to see if drivers are available for the device. In the Device Manager, select any device without drivers (normally in the “other” or “unknown” category), right-click the device, and in the popup menu select Update Driver Software.
Another option is to use a third-party driver finder program to look for updated Vista drivers. These programs scout the web for driver updates, so if there is a Vista driver for your device, one of these programs will have it. Please see our driver update program compare page for more information.
Using XP Drivers in Vista
So what if there are no Vista drivers for your hardware? Well, one thing you can try is to see if your Windows XP drivers will work under Vista. This will not work for all devices, but it is worth a try.
There are a few steps required to make this possible:
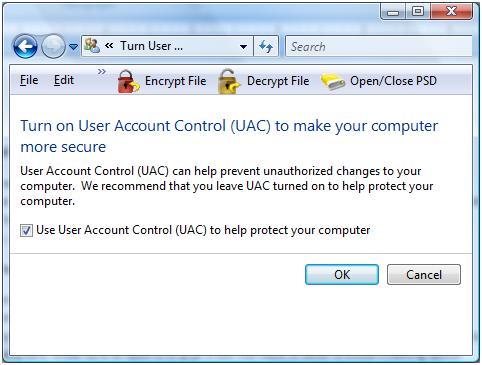
1 – First of all, disable the User Account Control if it is on, as it can block incompatible driver installations. Open up the Vista Control Panel, go to User Accounts and Family Safety, and then select User Accounts.
Now click the Turn User Account Control on or off-link.
Click the Continue button when the UAC asks for a confirmation.

Clear the checkbox Use User Account Control (UAC) to help protect your computer and click OK.
Click Restart Now to restart your computer with the UAC disabled.
2 – The next step is to locate your Windows XP driver for the device. It could be on the installation CD for the device or you can download it from the manufacturer’s website.
3 – Open up a Windows Explorer window to the driver location.
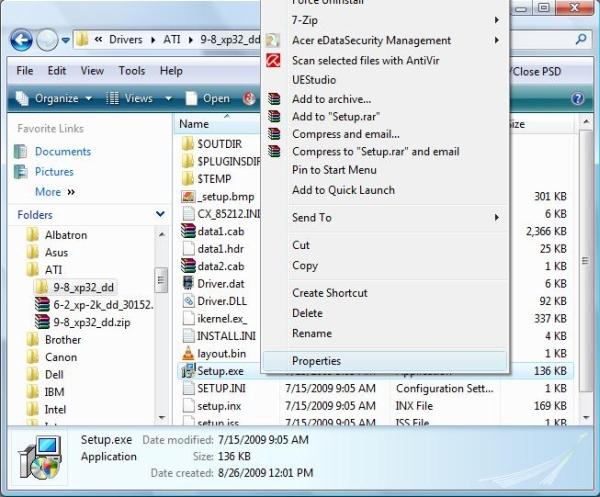
4 – Select the installer program, which will be a file with the .exe extension. This could be the installer package itself, or in the case of a .zip file, extract the contents of the zip file to a folder and locate a setup.exe, install.exe, or similar.
5 – Right-click the EXE file and in the popup menu, select Properties.

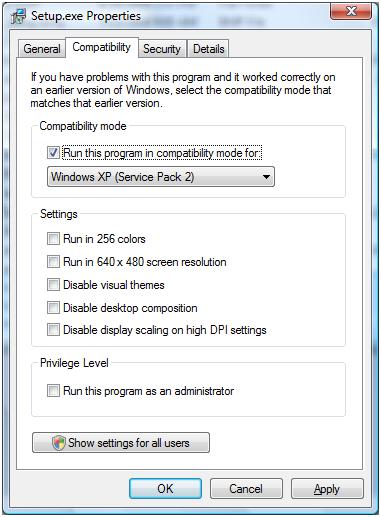
6 – In the Properties dialog box, select the Compatibility tab.
7 – Now select the checkbox in front of Run this program in compatibility mode for, and leave the default selection of Windows XP (Service Pack 2) and click OK.

8 – The final step is to double-click the EXE file and start the driver setup. Windows Vista will start the driver installation program in XP compatibility mode, and this will allow some Windows XP drivers to be installed in Vista.
Please note that even if the driver install completes successfully, this is not a guarantee that the device will work, or that all functions of the device will be working like they were in XP, but for quite a few devices this has allowed me to use non-Vista drivers.
Once complete, simply check your Device Manager to see if the driver installation was successful and if the device is properly recognized.
Do not forget to turn on the User Account Control again in case you had it on before!
Entry Filed under: Device Drivers


1 Comment Add your own
1. False Positives in Driver… | February 10th, 2022 at 4:13 pm
[…] for Windows 10 will in most cases be compatible with Windows 11. The same is true for using XP drivers in Vista and Vista drivers in Windows 7 (and in some cases even in Windows […]
Leave a Comment
Trackback this post | Subscribe to the comments via RSS Feed